Home > Questions & Answers

Questions & Answers

Use the quick search button or find your questions below.

Frequently Asked Questions

Your choice. Check with your local lumberyard or contractor for proper spans. The SK24-B is designed to handle any typical 4X beam. The heavy duty SK-24-HDB is available for 4X or 6X beams.

The bracket does not attach to the roof. It attaches through the roof and fastens to the exterior wall top plate using only Simpson Strong-tie SDS ¼ x 3” fasteners which are included with the bracket. See installation sheet.

The bracket is to be incorporated into a designed system. It is the responsibility of the installer to design and calculate. The SK-24-HD is engineered for seismic and lateral loads. The lighter bracket relies on the outline posts in combination with alternate bracing.

Use a standard pipe jack flashing. We highly recommend the LifeTime Tool UPF 100% silicone flashing found in our store.

We ship online orders to Canada via Fed Ex International. Currently, there is no brick and mortar retail or distribution set up at this time.

The unique design creates a chimney effect, with the air pressure blowing up and out. It provides resistance from rain or inclement weather blowing in and removes pesky barbecue smoke.

Some treated wood may have excess surface chemicals making the wood dangerously corrosive. Accordingly, the product may not be used with pressure treated wood with a greater than .25 pcf. Comply with pressure treated manufacturer guidelines.

The SK24-B is intended for trellis application or light weight poly-carbonate roof panels. Use the SK-24HDB with composition roofing products, high wind areas, heavy snow loads. For coastal conditions, the heavy duty, hot dipped, galvanized SK-24HD-GALV is recommended.

The SK-24-B is 24” tall. 30” and 36” can be special ordered in the HD (heavy duty) versions. Yes, a bracket can be cut down by re-drilling a different, through bolt hole.

Installation Tips

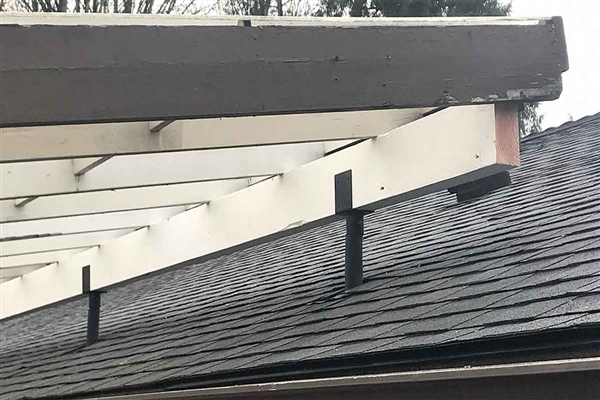
If you have installed a patio pergola using the SkyLift Roof Risers, and you need to replace the roof shingles, you first need to access the condition of the through roof-flashing. That flashing, (typically Ultimate Pipe Flashing (UPF) that SkyLift sells as part of their Roof-Riser system), creates a weather seal around SkyLift roof risers using a flexible boot that fits tightly around the vertical supports. 

The boot should be free of cracks or damage, and not show any signs of degradation through exposure to weather or sunlight. Unless the UPF is in near-perfect condition, we recommend replacing the flashing when re-shingling a roof.

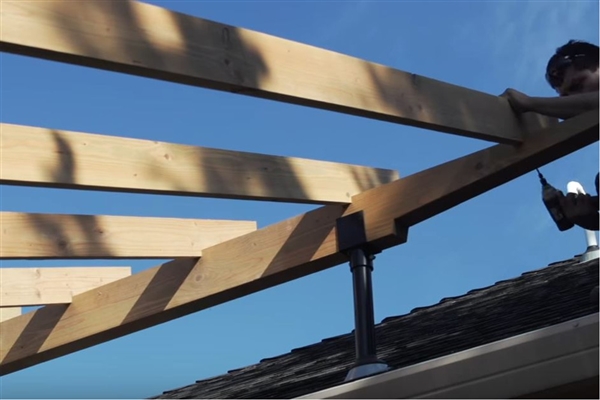
To replace the through-roof flashing, use a two-part flashing such as the Garrdal system. As you remove the existing roof shingles, cut away the original flashing as well. Then install the new shingles and integrate the two-part Garrdal system per the manufacturer’s instructions.

If the existing UPF is in good shape and you opt to reuse it, start by carefully removing the shingles around the flashing apron to expose the attachment nails. Slide a shallow flat-bar under each nail head. Then lift and remove the nail without damaging or distorting the apron.

When the apron is loose, slowly slide the flashing boot up the roof riser. To keep the boot from inverting and becoming damaged, rotate the flashing slightly side to side as you lift it.

Install the new shingles up to roof riser, and carefully slide the UPF back down until the apron meets the plane of the roof. Then properly re-integrate the flashing apron with the courses of new shingles as you reroof.

Product Knowledge

Project Design & Planning

Project Engineering

Articles & Resources